Showing posts with label craft articles. Show all posts

Thursday, November 14, 2013

Pumpkin Pie Thanksgiving Craft (with modifications)

It's the pumpkin pie time of year, so let's make a delicious smelling pumpkin pie craft! You can find all of the details right here. You might be surprised, thinking about this craft, that many kids have absolutely no idea what a pumpkin pie looks like. So, let's show them! Just a looking at a picture of a real pumpkin pie could really help put this craft into perspective!

So here you go:
Have fun!

Monday, November 11, 2013

Thanksgiving Shape Person (with modifications)

Your kiddos are going to get a chance to make a Native American... out of a bunch of shapes! You'll find it right here, by clicking the big image and then the "Indian Shape Person" link. When looking at this activity, there are 2 things that come to my mind. One is definitely to pre-cut those shapes. The other is to create a completed version of the activity for your little ones to take a look at before getting started. And with that being said... have fun!

Tuesday, November 5, 2013

Feet Flags (with modifications)

Today, we're going to make an American Flag... with out feet! One of the most important things to consider when working on an activity like this one, is to really prepare your children. For starters, make sure that they truly know what an American Flag looks like - it will be so helpful to them and they will get so much more enjoyment out of the craft that way. The idea here is that your kiddos are going to have their feet painted and, then, they will use their feet to walk across a piece of paper, creating stripes on an American flag. If you think that your little ones can use a little more direction than just, "walk," consider adding lines to the paper, for your children to follow along as they walk. Have fun!

Sunday, October 13, 2013

Footprint Ghosts


What better way to celebrate Halloween, than to make our own ghost? This one, we'll create on som black construction paper. You're going to need some white paint, a paint brush, a little bit of glue, and googly eyes.


All that you're really going to be doing is painting the bottom of your children's feet  white. If you can get this far, shoes and socks off and painting their feet without hysterical ticklish laughter, you've done great. Now, help them to take their painted foot and press it down onto the construction paper. Voila! A ghost - the heel part being the head area and the toes being the bottom. Two raindrops of glue to stick on two googly eyes and your kiddo is all set. Have fun!

Thursday, October 3, 2013

Cotton Clouds Art

Let's make some clouds out of cotton today! You'll need some paper, blue paint, cotton balls, and glitter. The idea is easy: the kids can glue their cotton balls, in their original shapes and sizes or stretched, to their paper. Then, ask them to dip two or three of their fingers into the paint to make rain drops. Finally, have them sprinkle glitter onto the raindrops to make them sparkle and shine! Have fun!

Tuesday, October 1, 2013

Rainy Fall Day Craft

We're going to work on a rainy fall day picture. You'll need some construction paper - one sheet of grey and one sheet of blue per kiddo, cotton balls, aluminum foil, and glue.

Here's how this one is going to work: your kids are going to do all of their work on the grey paper, because grey is the color of rainy fall day sky. They can stretch out the cotton balls into almost any shape they want and glue them on the paper to represent clouds. Then they can add small pieces of blue paper for raindrops and pieces of cut aluminum foil for both lightening and puddles.

Have fun!

Monday, September 30, 2013

Wind Art

Let's make our own wind today, using either a blow drier or a fan. Go ahead and cover the floor and the wall with some large sheets of paper. Next, have the children drip some thin paint in front of that blow drier or fan and watch the wind spread the paint and make all sorts of gorgeous designs!

Fall Straw Art (with modifications)

Here's a super fun activity that I discovered on The Perpetual Preschool site. It's called, Wind Art, and all that your little ones are going to need is some paper, paint, crayons, and a straw. Ask your little ones to draw a picture of an outside scene (their house, playing on the playground, etc.). Once that is all set, they can put just a little bit of paint on the sky and use the straw to blow it across the page. The wind-like effect is very cool!

MODIFICATIONS: You might want to make sure to practice blowing through straws prior to bringing out all of the other supplies for this one. After all, we normally suck things up with a straw and no one wants one of their kiddos to suck the paint instead of blowing it. So, just go ahead and hand out those straws out ahead of time and give them some practice, blowing air into their hands or the like. Have fun!

Tuesday, September 17, 2013

Your Family Box! (super cute family craft)


This wonderful idea came from Dee Feeney over at the Perpetual Preschool website - it's a Family Box and it's going to take a few days, so that everything can have a chance to dry. Here's what you do:
Day 1
Paint a shoebox, inside and out. You can paint it your favorite color or colors or use favorite colors of everyone in your family.

Day 2
Glue on collage materials. Anything that you think will look great most certainly will, so go for it - glitter, ribbon, sequins, pieces of paper cut into shapes and designs - really, anything!

Day 3
Into the inside, glue pictures of the people in your family.

And there you have it - your Family Box!

Thursday, September 12, 2013

How Am I Feeling? Puppet (recognizing emotions)

Emotions are such an interesting thing. We can feel them much more strongly that we can even recognize them. Children, especially, can express themselves quite well, yet they can't quite pinpoint the name of the emotion that their feelings or necessarily figure out why they are feeling that particular emotion. Talk to your kiddo about emotions/feelings and what might cause them. Even make some faces together, noting some of the changes that actually occur on your face when you change emotion/expression. 

Then, bring out your Emotion Puppet craft - a chance to cut out different facial features and turn them into a puppet! This is such a good opportunity to help a kiddo who might not be the best at identifying the emotions of others to get some practice and extra guidance. Have fun!

Sunday, September 8, 2013

Mirror Painting (with modifications)

Let's get into some finger painting today... some mirror finger painting! Here's how it works, ask your little one have a seat in front a mirror. Make sure that they are sitting on a towel, an old sheet, or something that you either don't mind getting a little painty or that is easily washable. Ask you kiddo to pay particular attention to his face, having him describe what he sees. Now, you're ready. Using fingerpaint, your child paint the face that he sees right on top of the the reflection, on the mirror itself. After the basic head and face is drawn, go ahead and encourage your little one to add hats, bows, earrings, and what have you... just for some extra fun! When he's done, snap a quick picture of it with you camera, wipe down the mirror, and start again!

MODIFICATIONS: Make sure to explain this task carefully to your kiddo before starting. This is something very new and different than most children do and could be the cause of unnecessary confusion or anxiety. Have fun!

Friday, June 14, 2013

Marble Painting!

This is a super fun activity that I did with my preschool class many, many times. It works so great because it can go along with just about any theme. Here's what you need:

- Coloring Page to match your theme
- Marbles
- Paint
- Bowls to hold the paint
- Spoons to fish the marbles out of the paint
- Aluminum Baking Tins with lids

Your kiddo is going to place the coloring page, picture side up, into the baking tin. Then, she'll put the marbles, covering in whatever color paint she chose, into the tin as well. She can then snap on the lid and start rolling and shaking (gently) away until her picture is all painted (or she needs more paint on her marble(s). This is so much fun and the kids have always loved it!

Before letting the kids go off and do this one by themselves, you might consider modeling it for them - but that depends completely on you and your little ones. Have fun!

Tuesday, April 30, 2013

Feet Flowers (with modifications)

It's always fun to get out the paints and create a beautiful spring picture, don't you think? Why not have your little one work on a lovely spring scene, featuring grass, trees, some birds, the sun... and footprint flowers? Go ahead and ask your little one if you can put paint on his foot so he can stomp around on his paper and make some beautiful spring flowers. When those are done, he can draw some stems stretching from the painted flowers down to the ground. Now, if the kiddo isn't too keen on getting his feet painted, there are a number of things that you can try. First of all, you can certainly ask if he would like to have his hands painted instead. If not his hands, maybe his elbows. If paint just isn't in his future, then you can give up the body painting all together and move to tracing. Go ahead and trace the outline of your child's foot, wherever he wants to put it on the page. Then, he can simply color or paint inside of the lines and he is all set.  Viola! A perfect spring picture!

Thursday, April 25, 2013

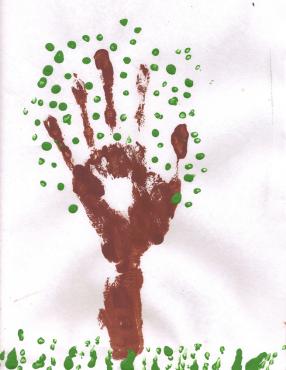
Painting Trees (with modifications)

We're going to make some trees and work on some fine motor skills while we do it. You can probably get a pretty good idea of what the steps to this one are, just by looking at the picture. If you'd like to see the specific instructions, go ahead and do that and, then, make sure you read below for some thoughts that could help your little one.


MODIFICATIONS: Right off the bat, if your kiddo is not one to enjoy painting on his arm and hand in the name of art, don't try to force the issue - trace your little ones arm and hand instead. Then, have him go ahead and paint inside the traced area. He can even use something like a cut piece of potato to paint with. It'll give the tree some texture and provide the opportunity for additional awesome benefits. What benefits are those? I'm glad you asked. I go into more detail on those benefits in on that in this Get More Out Of Painting Article. Now that the trunk is done, it's time for the tree leaves. Try the eraser side of a pencil, making sure to remind your kiddo to dot, as described in the, "Get More Out Of Painting," piece. Have fun!

Wednesday, April 24, 2013

Painting A Tree (with modifications)

Here's a fun and fun and easy painting activity for your little one to do that ties into the Earth Day and Arbor Day time of year. It's a picture of a tree. The way that the craft is designed, kids go ahead and use their fingerprints to create the leaves on the tree as well as some little birds. That doesn't necessarily work for every kiddo as there are many, many children who do not want their fingers all painty. Here's the original link (and then check out my idea below it:


MODIFICATIONS: So, what I was thinking is that your little one can actually go outside and search for something like a rock to use in place of their finger or paintbrush. It will avoid the problem of their finger getting all painty but, at the same time, keep their art different and interesting. Have fun!

Tuesday, April 23, 2013

Practice Cutting A Tree Picture (with modifications)

Kids like cutting stuff. With Arbor Day just around the corner, let's
give them a picture of a tree to cut out. Once your little one does that, she can decorate it, color it, whatever her heart desires. Nice, simple, and definitely something that kiddos will enjoy. Grab the page and then check out the modification.


MODIFICATIONS: Sometimes, when it seems like a kiddo is having a hard time cutting on the line, it's not only about the physical act of cutting. Sometimes, kids just find it tough to follow it along - yes, even when it's a thick black line on a solid white page. If your little one is having difficulty, go ahead and trace that outside line with a highlighter. Green and blue work great. It really can make a world of difference!

Monday, April 22, 2013

Cute Handprint Earth Craft (with modifications)

Happy Earth Day! There's a really fun and easy craft that's just perfect for a day on which we celebrate our planet and all that you need is some paper plates, some blue and green paint, and glitter and glue (though they are optional). You've seen the picture. You can check out the details and then hop on below and I'll give you a tip that might help your kiddo.


MODIFICATIONS: How many of you have a little one who is not a fan of having his hands painted? Sometimes, to help with this we go ahead and give the kiddo a pair of gloves to wear while working with the paint. Let's try something different this time. Once that blue paint is dry, have your child place his hands onto the plate, in the appropriate spots, and then trace them. Make sure that the outlines are very distinct. You can even go over what you have traced with black, or even green, permanent marker so that it stands out even more. From here, have your little one grab his paintbrush and, very carefully, paint in his handprints. Super cute!

Thursday, April 18, 2013

Tissue Paper Earth (with modifications)

Here's a fun and easy craft for Earth Day that you can do with your little one. It comes with a really cute poem from SomewhatSimple.com. Go ahead and grab the page and then check down below to see what I came up with to help your child be as successful at this activity as possible, while also growing and developing along the way.


MODIFICATIONS: One of the trickiest parts of this activity is getting your kiddo to keep those tissue paper squares inside the Earth circle. So, here's the thing - I have thought and thought about this and I keep coming back to the same issue. Saying within the lines here is hard. That circle is going to start to get covered up by the tissue paper and then all bets are off, as it is. That pretty much rules out using a marker to highlight the circle - you won't be able to see that when it's covered up, either. I do think that there is benefit to having the child glue tissue paper around the circle first, right on the line. While this might help create that border in the child's mind, however, it might also be very boring and turn your little one off from this activity much more quickly. You can draw a happy face on the inside of the circle and a sad face on the outside of the circle and explain to your child why each face is feeling the way that it is in relation to where you should glue things. And then I thought that, maybe this isn't the right activity to be worrying about staying in those lines. Maybe it is too tough at this point and, what a child needs is to be able to complete the craft, from start to finish, successfully, getting to look at the final product that, in fact, looks as it should. Eureka! Print out 2 copies of the paper. Cut the circle out of one of them. Give your child that circle and only that circle to glue the tissue paper onto. When that part of the activity is complete, produce the second page and have your child glue their circle right onto the circle on the new page. There you have it! A great looking craft, while doing an end run around the trickiest part. However, it still gives your little one that, "staying within the lines" feel and some basic practice at it, believe it or not. Just, practice that he can be successful at right now.

Tuesday, April 16, 2013

Paper Plate, Puffy Paint Earth (with modifications)


This is a wonderful art activity that is just perfect for Earth Day!
It's originally from the Itsy Bitsy Learners website and it has the kids making the planet Earth out of a paper paint and some amazing puffy paint that you can make, right at home. Check out the pictures and the description of the craft and then come on back here and read through my modification. It just might help!

MODIFICATIONS: This activity is a ton of fun. However, you may need a little bit of extra help from losing your kiddo's attention somewhere in the middle, due to the confusion as to what to come next. Before you do anything else, make sure to show your little one a good picture of the Earth, that will really help him to see what the land and the water look like. Then, you can explain the task at hand. Something that also might benefit your child is a sort of visual schedule, taking him step by step, through the whole thing. Fortunately, there are some great pictures of each step along the way that you can show your little one, while you explain what is going to come first and what is going to come next. Finally, and a biggie with any crafts or activity, make sure that you have the materials ready to go before calling your child over to start. There is nothing that causes a child to lose interest in an activity more than a parent/teacher who is not in the moment because they are busy looking for supplies. This can happen so easily so do be sure to try to avoid it, when possible.

Monday, April 1, 2013

Mismatched Animal Craft (with modifications)

Here's a fun idea that can work for April Fools Day or any time of the year. Grab yourself some pictures of animals. The can be from a magazine, from Google, or anywhere. Cut them in half and glue one half to the animal to a sheet of paper. Then, go ahead and give your little one a crayon and ask him to draw the other half of the animal being as silly as she can be, as opposed to accurate. I found this cute idea at Preschool Express.

MODIFICATION: This type of imaginative work might be a little tough for some kiddos. If you find that to be the case, go ahead and give you other halves of the cut pictures to your little one - the only catch is that she cannot glue the 2nd half to the matching 1st half but, rather, must make a new, silly looking animal. If even this is objectionable to your kiddo, consider working alongside her. She can glue the picture back together correctly and you can glue yours in silly combinations. Who knows? She might just want to get in on the fun and, if not this time, maybe next time. Have fun!